
Many people work at computers for hours, yet few realise that monitor positioning greatly affects posture and comfort.
If a monitor is too low or too far away, users unconsciously lean or tilt, which can strain their necks and reduce productivity.
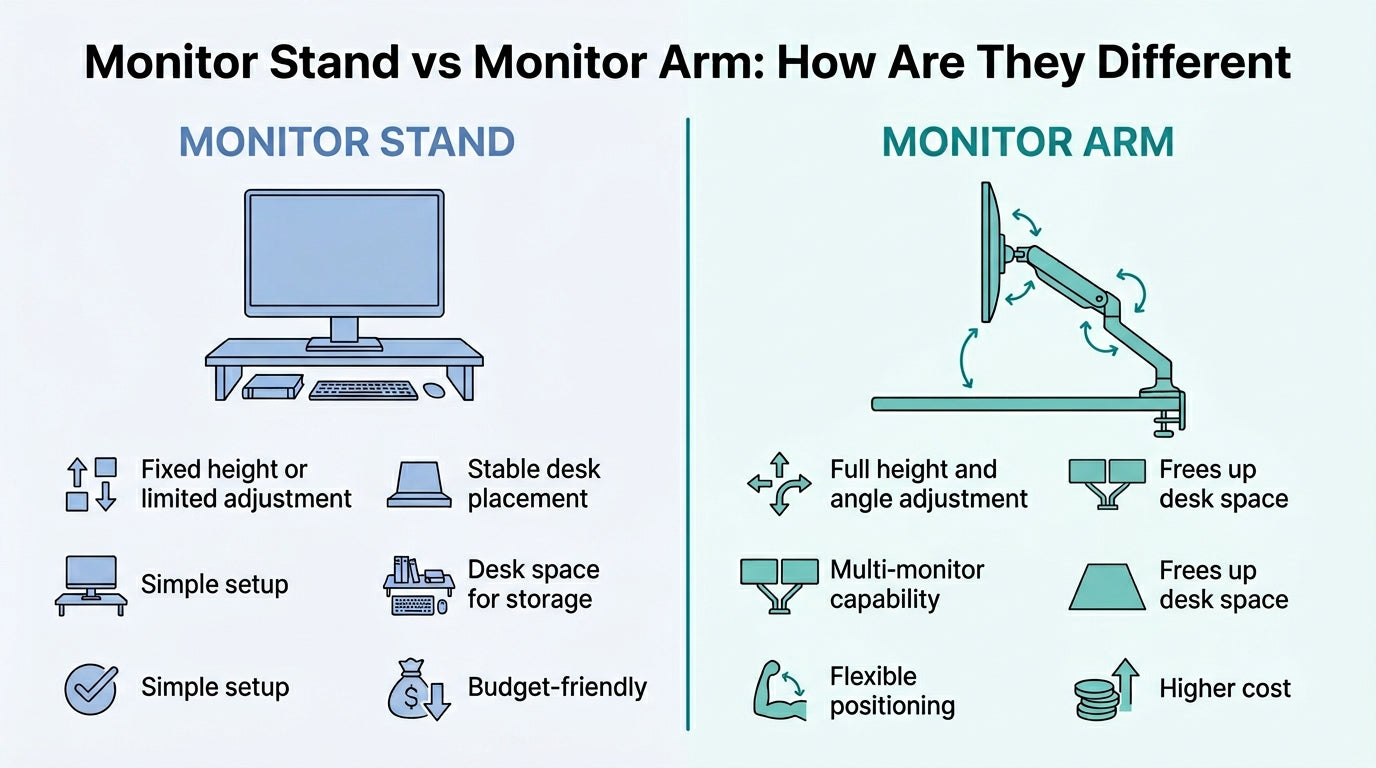
A monitor mount lets you adjust screen height, distance, and angle, making it easier to keep the monitor at eye level for better ergonomics.
In this guide, we walk you through installing and adjusting your monitor mount properly so you can build a more comfortable and efficient workspace.
Key Takeaways
- A monitor mount puts your screen where it should be: at the right height, distance, and angle. That means less neck strain and better posture, even on long days.
- Proper installation is important for both safety and performance. A securely installed monitor mount keeps the screen stable and allows smoother adjustments.
- Not every mount fits every desk. Desk clamps, grommets, wall mounts, and monitor arms all offer different levels of flexibility.
- Getting the adjustments right matters as much as the install. Height, distance, tilt, and alignment all shape how comfortable your setup feels.
- A good monitor mount boosts productivity and keeps your desk clear. Free up space and make your whole setup work harder for you.
What Is a Monitor Mount?

A monitor mount attaches a monitor to a desk or wall, making it easy to find a comfortable viewing angle and improving ergonomics.
Most monitor mounts are designed to work with the VESA mount standard. VESA is a widely used mounting pattern that allows monitors to be attached to compatible mounting plates using screw holes on the back of the screen. The most common VESA patterns are 75 × 75 mm and 100 × 100 mm, which are supported by many modern monitors.
A monitor mount often comes in the form of an adjustable arm that allows the screen to move vertically, horizontally, or tilt depending on the user’s needs. For example, a VESA monitor arm allows users to adjust the monitor height, rotate the screen, or move it closer or farther from the desk.
Compared with traditional setups that rely on a monitor stand, a monitor mount offers greater flexibility and helps free up desk space. Because the monitor is lifted off the desk surface, users gain additional room for keyboards, notebooks, and other accessories.
For professionals who spend long hours working at a computer, a monitor mount provides a practical way to create a more ergonomic and organised workstation.
Why Proper Monitor Mount Installation Matters
 Installing a monitor mount correctly is important because it affects both safety and ergonomics. A well-installed mount keeps the monitor secure, improves screen positioning, and helps users get the full benefit of a more comfortable workstation.
Proper monitor mount installation matters because it helps:
- Keep the monitor stable and secure: A correctly installed mount reduces the risk of wobbling, slipping, or uneven positioning during daily use.
- Support better posture: When the mount is installed properly, the monitor can be positioned at the right height and angle, helping users avoid leaning forward or tilting their heads.
- Improve ergonomic screen alignment: A well-positioned monitor should sit at or slightly below eye level and directly in front of the user. Proper installation makes this easier to achieve.
- Ensure correct VESA compatibility: Most monitor mounts rely on the VESA mount standard. Matching the mount to the correct VESA pattern helps the monitor attach safely and securely.
- Allow smoother adjustments: When the arm or mount is balanced and tightened properly, users can adjust height, tilt, and viewing distance more easily.
- Free up desk space effectively: A properly installed monitor mount lifts the screen off the desk, creating more room for accessories, notebooks, or a cleaner overall setup.
Taking the time to install a monitor mount properly can make a noticeable difference in comfort, usability, and workspace organisation. It helps ensure the setup is secure while making it easier to maintain better posture throughout the workday.
Types of Monitor Mounts
 Monitor mounts come in several designs, each suited for different workspace layouts and ergonomic needs. The right monitor mount depends on factors such as desk layout, available space, and the level of screen adjustment flexibility you want.
Below are some of the most common types of monitor mounts used in modern workstations:
- Desk Clamp Monitor Mount: A desk clamp mount attaches directly to the edge of a desk using a clamp mechanism. This is one of the most popular types because it is easy to install and does not require drilling into the desk. Desk clamp mounts work well for most home offices and standard workstations.
- Grommet Monitor Mount: A grommet mount passes through a hole in the desk and is secured with a bolt or plate underneath. This type of monitor mount offers excellent stability and is often used in desks that already include cable management holes.
- Wall Monitor Mount: Wall-mounted monitor mounts attach directly to the wall rather than to a desk. This option is useful for workspaces with limited desk space or for users who want a more permanent monitor placement. Wall mounts are commonly used in offices, control rooms, and shared work environments.
- Single Monitor Arm Mount: A VESA monitor arm is one of the most flexible monitor mount solutions. It allows users to move the screen up, down, forward, and to the sides while maintaining ergonomic alignment. These mounts are commonly used for adjustable desk setups.
- Dual Monitor Mount: Dual monitor mounts support two monitors on a single mounting system. They are commonly used by professionals who work with multiple screens, such as designers, developers, or analysts.
Most modern monitor mounts are compatible with the VESA mounting standard, allowing monitors with mounting holes on the back to attach securely to the mount.
Choosing the right monitor mount depends on how you use your workspace and the level of adjustability you need for a comfortable, ergonomic setup.
How to Install a Monitor Mount
 Installing a monitor mount is usually straightforward, but following the proper steps ensures the monitor remains stable and properly positioned for ergonomic use. A properly installed mount also allows you to adjust the screen easily while keeping the workspace organised.
Below is a step-by-step guide to installing a monitor mount.
Step 1: Check Monitor Compatibility
Before installing the mount, confirm that your monitor supports the VESA mount standard. Most modern monitors have four mounting holes on the back arranged in patterns such as 75 × 75 mm or 100 × 100 mm.
These holes allow the monitor to attach securely to a mounting plate or VESA monitor arm.
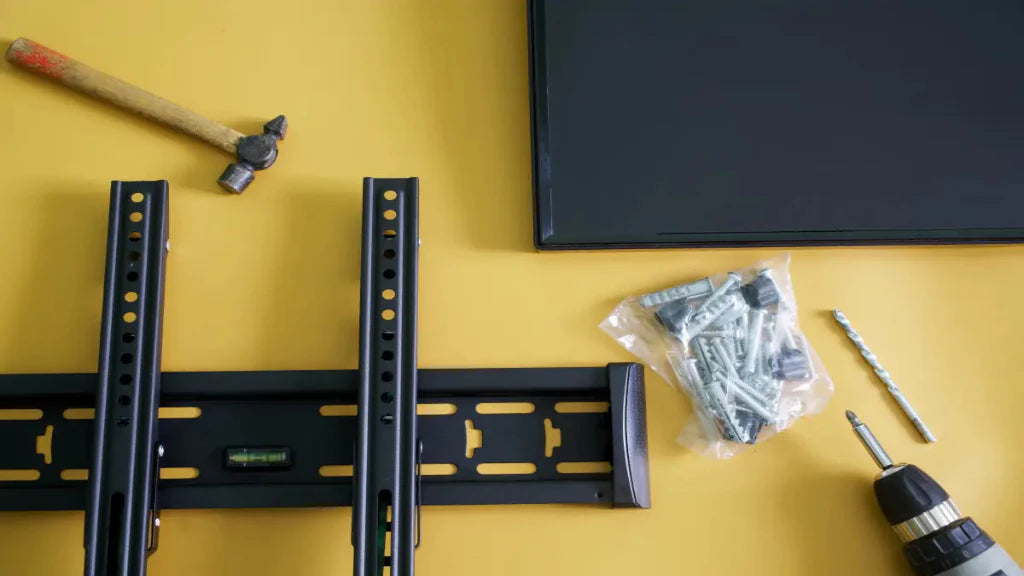
Step 2: Prepare the Mounting Components
Most monitor mounts come with a set of components needed for installation, including:
- Mounting plate
- Screws and washers
- Adjustment tools or Allen keys
- Desk clamp or grommet base
Before you start, check that you have all the parts and that your mount can handle your monitor’s weight.
Step 3: Attach the Mount to the Desk
Secure the mount base to the desk using the chosen mounting method.
- Desk clamp mounts attach to the edge of the desk and are tightened with a screw clamp.
- Grommet mounts pass through a hole in the desk and are secured with a plate underneath.
Tighten the base so it stays put while you work.
Step 4: Attach the Mounting Plate to the Monitor
Next, attach the mounting plate to the back of the monitor using the screws provided with the mount.
Line up the plate with the VESA holes and tighten the screws evenly so your monitor stays secure.
Step 5: Connect the Monitor to the Mount Arm
Once the plate is attached, carefully lift the monitor and connect it to the mount arm. Most mounts use a hook or a locking mechanism to secure the monitor in place.
After attaching the monitor, tighten the locking screws to prevent the screen from shifting.
Step 6: Adjust the Monitor Position
Once installed, adjust the monitor mount so that the screen sits comfortably in front of you.
You can adjust:
- Height to align the monitor with eye level
- Tilt angle to reduce glare
- Distance to keep the screen about an arm’s length away
- Rotation, if you need portrait viewing mode
These tweaks make sure your setup actually supports good ergonomics.
Step 7: Organise Cables
Run your cables along the arm or through any cable clips. Tidy cables mean less clutter and smoother monitor movement.
Follow these steps, and you’ll have a secure mount and a workspace that supports better posture, comfort, and focus.
How to Adjust a Monitor Mount for Ergonomic Positioning

Once your monitor mount is installed, the next step is to adjust it so the screen provides a comfortable, ergonomic viewing position. Proper adjustment helps reduce strain on the neck, shoulders, and eyes, especially during long hours of computer use.
Here’s how to fine-tune your monitor mount for real ergonomic gains.
Step 1: Adjust the Monitor Height
Start by positioning the monitor so that the top of the screen sits at or slightly below eye level when you are sitting upright. This allows you to look straight ahead at the screen instead of tilting your head downward.
Most VESA monitor arm mounts allow smooth vertical adjustment, making it easy to align the monitor with your natural eye level.
Step 2: Set the Correct Viewing Distance
Position the monitor approximately an arm’s length away from your eyes. This distance helps reduce eye strain and ensures that the entire screen can be viewed comfortably without leaning forward.
If the monitor is too close, it may cause eye fatigue. If it is too far away, you may find yourself leaning toward the screen.
Step 3: Adjust the Screen Tilt
Tilt the monitor slightly up or down to align with your line of sight. The goal is to create a viewing angle that reduces glare while allowing you to read the screen comfortably.
Most monitor mounts offer a small tilt range, allowing users to fine-tune the display angle.
Step 4: Centre the Monitor with Your Body
The monitor should sit directly in front of you, not off to one side. The centre of the screen should roughly align with your nose so you do not have to twist your neck while working.
Proper alignment helps maintain a neutral sitting posture.
Step 5: Adjust the Monitor Arm Tension
If your mount includes adjustable tension joints, use the provided tools to fine-tune the arm resistance. This ensures that the monitor stays in place while still allowing smooth adjustments when needed.
Balanced tension keeps your screen from drifting down.
Step 6: Check Screen Orientation
If your monitor mount allows rotation, you can switch between landscape and portrait orientation depending on your workflow. Portrait orientation can be useful for reading documents, coding, or working with long web pages.
Step 7: Fine-Tune Your Setup
After making the initial adjustments, sit in your normal working position and check whether the monitor feels comfortable to view. Make small adjustments to height, distance, or tilt until the screen position feels natural.
Properly adjusting your monitor mount ensures that the screen supports good posture and helps maintain a comfortable workstation throughout the day.
Tips for Maintaining an Ergonomic Monitor Setup
Once your monitor mount is installed and adjusted, it is important to maintain a workspace that continues to support good posture and comfort. Use this checklist to ensure your desk setup remains ergonomic during everyday use.
Here’s an Ergonomic Monitor Setup Checklist for your reference:
- The top of the screen should sit at or slightly below eye level when sitting upright.
- Keeping the screen about 50–70 cm from your eyes helps reduce eye strain.
- The centre of the screen should align with your nose so you do not twist your neck while working.
- Adjust the tilt of your monitor mount so the screen is easy to view without reflections from overhead lighting or windows.
- Your elbows should remain close to your body while typing or using the mouse.
- Your feet should rest flat on the floor, and your lower back should be supported by the chair.
- The arm should hold the monitor securely without drifting or dropping when adjusted.
- Use cable management clips or channels to keep wires tidy and prevent clutter around your desk.
- Avoid placing the monitor directly in front of bright windows, as this can create glare.
- Following the 20-20-20 rule (look at something 20 feet away for 20 seconds every 20 minutes) helps reduce eye fatigue.
Keeping these points in mind helps ensure your monitor mount setup continues to support comfort, posture, and productivity throughout the workday.
Improve Your Workspace with the Right Monitor Mount Setup
Installing and adjusting a monitor mount correctly can make a significant difference in how comfortable your workspace feels. When the screen is positioned at the right height and distance, it becomes easier to maintain proper posture, reduce strain, and stay productive throughout the day.
Beyond ergonomics, a well-positioned monitor mount also helps free up desk space and create a cleaner workstation. With the right setup, your desk becomes more organised and easier to work from during long hours of computer use.
If you are looking to upgrade your workspace with ergonomic desk solutions, explore the range of monitor mounts, VESA monitor arms, and monitor stands available at Guilds.
Our thoughtfully designed products help you build a workstation that supports comfort, flexibility, and everyday productivity. Contact us today!
Frequently Asked Questions
Do I need special tools to install a monitor mount?
Most monitor mounts come with the basic hardware needed for installation, such as screws, mounting plates, and Allen keys. In some cases, you may only need a screwdriver to complete the installation process.
Can I install a monitor mount on a glass desk?
Installing a monitor mount on a glass desk is generally not recommended, especially for clamp-style mounts. Glass surfaces may not handle the pressure applied by the clamp, which could cause cracking or instability.
How long does it take to install a monitor mount?
Installing a monitor mount typically takes 10 to 20 minutes, depending on the type of mount and your desk setup. Once the mount is secured and the monitor is attached, additional adjustments can be made to optimise the viewing position.
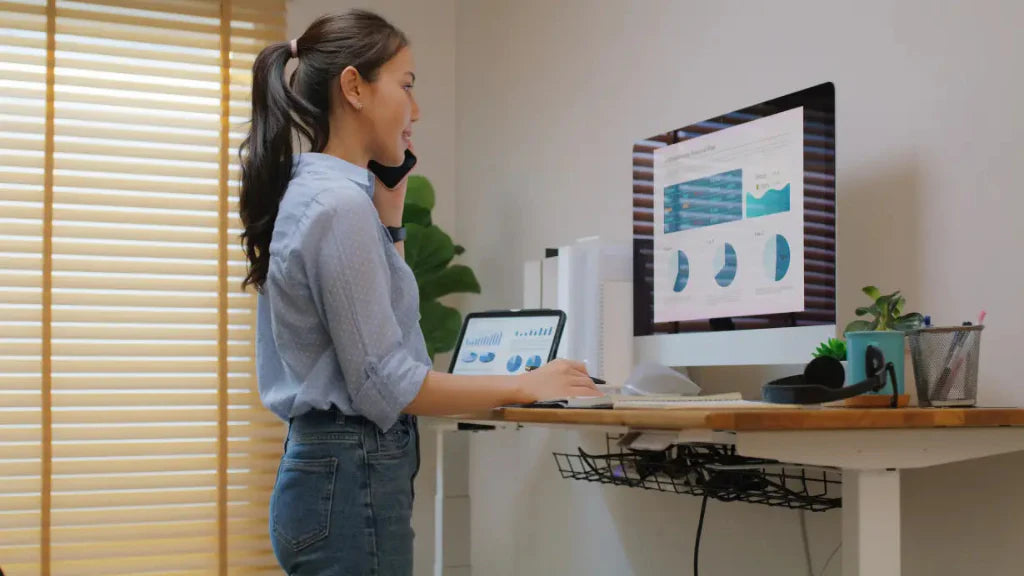
Can a monitor mount be used with a standing desk?
Yes, many monitor mounts work well with standing desks. Adjustable mounts allow users to reposition the monitor as the desk height changes, helping maintain proper screen alignment whether sitting or standing.
Can I move my monitor mount to another desk later?
Most desk clamp and grommet monitor mounts can be removed and reinstalled on another desk if needed. As long as the new desk supports the mounting method, the monitor mount can usually be reused without issues.
Leave a comment
This site is protected by hCaptcha and the hCaptcha Privacy Policy and Terms of Service apply.